 Many modern hearing aids now have an IP68 rating which is considered the "gold standard" for protection against moisture and debris; however, that does not make them impervious to the elements.
Everyday good habits
Though small, hearing aids contain powerful technology, and some parts are particularly delicate, such as the microphones and receivers.
According to McAlexander, “Maintaining the hearing aids includes keeping wax out of tubing and receivers, as well as the hearing aid microphones, storing the hearing aids in a safe place when not in use, and seeing your audiologist regularly for maintenance.”
Here are some additional good habits to get into when taking care of your hearing aids:
Handle with care
Handle your hearing aids carefully to avoid dropping or damaging them. Place your hearing aids on a soft piece of material when cleaning them or changing the batteries.
Beware of moisture
Always keep your hearing aids dry. Though most hearing aids are water resistant, they are generally not waterproof, meaning they should not be submerged in water. Trapped moisture can cause damage to the internal parts of your hearing aids and can even cause them to stop working. Furthermore, moisture can cause the batteries to corrode, damaging the hearing aid’s interior.
Some helpful tips to avoid moisture build-up include:
- Do not wear your hearing aids in the shower, hot tub, when swimming, or in the sauna.
- Take your hearing aids out when washing your face or when applying cosmetics such as hairspray, gel, or perfume.
- Don’t keep your hearing aids in the bathroom.
- Always make sure your ears are dry before inserting them.
- If you do get your hearing aids wet, you can dry them carefully with a towel.
- Do not use a heating device, such as a hairdryer to dry hearing aids; high heat can distort the plastic components.
- After cleaning your hearing aids, make sure all the parts are completely dry before putting them back together.
- If your hearing aids take disposable batteries, open the battery doors to release any moisture when you’re not using them.
“For those who perspire more than typical or those in a humid environment, it can be beneficial to use a dehumidifier on a daily basis,” advises Rosette Ruth Buahnik (formerly Reisman), AuD, MBA, a Clinical Account Manager at hearing implant maker MED-EL, adjunct professor, and owner of Urban Hearing in Brooklyn, NY.
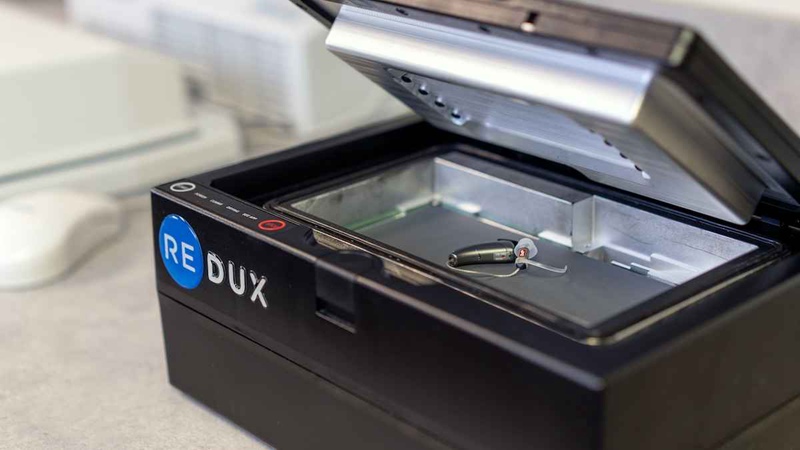
The Redux hearing aid drying system is an example of professional drying system you can find in some clinics. It employs a vacuum chamber to lower the temperature required to evaporate moisture and monitors the air inside the chamber in real time. Although this model is not for consumers (it has a price tag of $2850!), its popularity among hearing care clinics demonstrates just how important moisture control is for better hearing aid performance.
A dehumidifier is a sealable container where you can store your hearing aids. These include relatively simple devices and inexpensive cases that use desiccant crystals to remove any accumulated moisture from your hearing aids.
Check out:
- Dry & Store DryCaddy
- Stay Dri Hearing Aid Dryer
- Super Dri-Aid Hearing Aid Dehumidifier by Hal-Hen
Another option is to use a hearing aid dryer that uses forced air, gentle heat, or a dehumidifier to dry the hearing aids. These sometimes also feature ultraviolet light for sterilization. Although typically more expensive, the devices can be worth it in the long run, particularly if you live in humid areas, are active, or spend a lot of time outdoors.
Check out:
- Dry & Store DryBoost UV
- PerfectClean Hearing Aid Cleaning System
- Lexie Electronic Hearing Aid Dryer
You can take advantage of the professional Redux system (shown above) via their practice locator map featuring clinics that have the device. Note that hearing care offices generally charge a fee for this service.
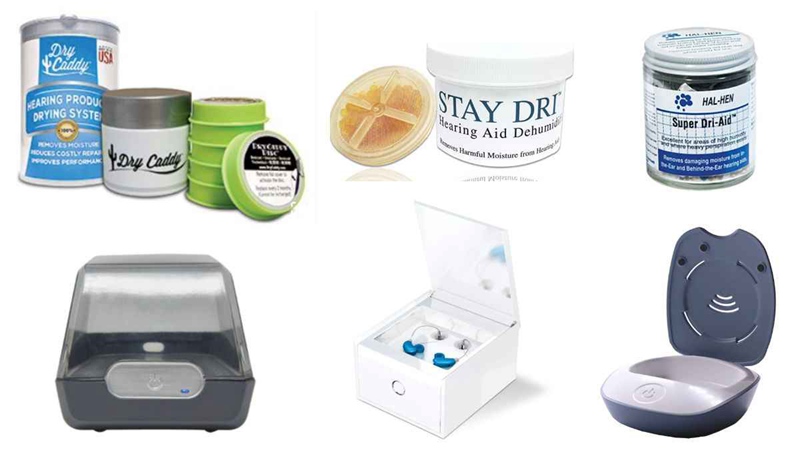
Some examples of hearing aid dehumidifiers and electronic dryers include (clockwise from top left): Dry & Store DryCaddy, Stay Dri Hearing Aid Dryer, Hal-Hen Super Dri-Aid, Lexie Electronic Hearing Aid Dryer, PerfectClean Hearing Aid Cleaning System, and Dry & Store DryBoost UV system.
Avoid extreme heat or cold
Temperature extremes can be damaging to hearing aids and their internal components. Do not store your hearing aids in a place with extreme heat, such as in direct sunlight or near a radiator. In cold weather, wear a hat to protect your hearing aids.
Prevent household mishaps!
To avoid damage or an emergency situation, be sure to store hearing aids out of the reach of children or pets. Also check to make sure your hearing aids aren’t in your pockets before washing clothes!
Pay attention to these four hearing aid “trouble spots”
Since you wear your hearing aids every day, you may sometimes need to replace certain parts due to general wear and tear, or if you lose a component. Depending on the type of hearing aid you have, here are four hearing aid components you may want to keep an eye on:
1) BTE hearing aid tubes and earmolds
Hearing aid tubes—also known as connector tubes—are an integral part of behind-the-ear (BTE) hearing aids. They are small plastic tubes that connect the main body of the hearing aid to the earpiece or earmold and allow sound to be transmitted to the ear.
Over time, hearing aid tubes may become discolored, hardened, blocked, or cracked, and will typically need to be replaced about every 6 months. If your hearing aid tube is damaged or becomes kinked, it can severely impact the function of your hearing aid.
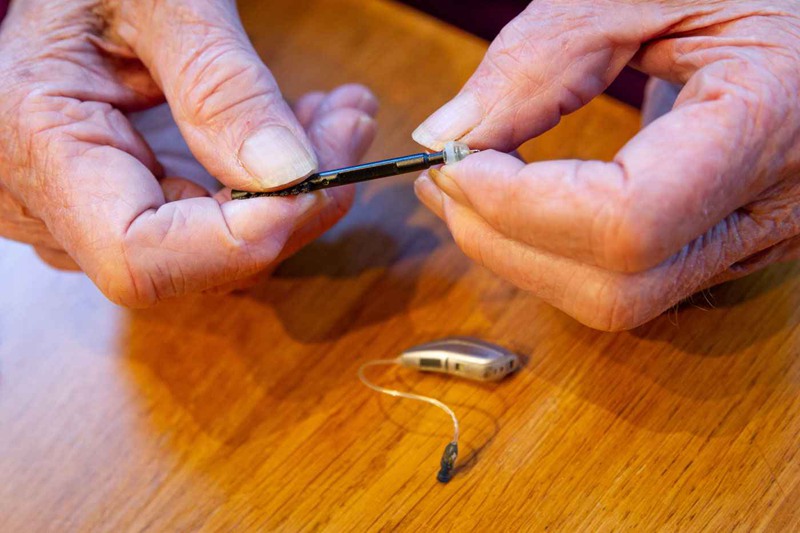
 Typically, each wax guard comes with a dual-function tool: a removal end for pulling out the old guard, and an insertion end that allows you to install the new filter.
 “If the trap is clogged there's a tool that will assist in removing the old guard and replacing it with a new one,” explains Buahnik. “The wax guards come preloaded onto wax guard tools or sticks. One end is used to remove the old wax guard and the other end allows for a replacement of a new wax guard.”
Replace the wax guard twice a year or when it looks worn, or misshapen, or if there is a build-up or blockage that can’t be removed.
Your hearing care professional will be able to provide further instructions on changing the wax guards for your hearing aids.
 An example of two hearing aid cleaning tool kits. Virtually all hearing aids come with cleaning tools, but cleaning kits are also available online for about $10 to $20.
What’s in your toolkit?
Your hearing aids should come with a cleaning toolkit for regular at-home upkeep. Most toolkits include some variation of the following:
- Cleaning brush: A soft brush to clean the body, faceplate, or sound port of your hearing aids.
- Wax pick or wire loop: A tool designed to help remove wax and other debris safely from hearing aid nooks.
- Multitool: An all-in-one tool, which contains both a brush and a wax loop for thorough cleaning.
- A soft dry cloth like those used for glasses or electronic screens.
- Vent cleaner: a thin bristle ideal for safely removing earwax and other blockages in the vent of hearing aid earmolds or in the ear hearing aids.
All these items are easy to purchase from your hearing aid provider or online. A few additional items you may want to buy include:
- A soft-bristle child’s toothbrush: This can be used as a wax removal brush.
- Disinfectant wipes: These can be used instead of a soft cloth. Always check first they are made for use with hearing aids.
- Alcohol-free cleaner: This can be used for cleaning the earmolds of in-the-ear hearing aids. Be sure you use one formulated especially for hearing aids.
- Cleaning wire or threader that can be fished through an earmold tube or a thin tube/vent to remove wax that may get lodged inside. A good commercial product for this purpose is NanoClean.
Routine (daily/weekly) cleaning
The most common reason for a hearing aid to sound muffled or weak is that it is clogged with wax or debris. To maintain your hearing aids, it's best to clean them every few days or at least once a week to ensure they are working at their best. Luckily, it’s quick and easy to clean your hearing aids.
Buahnik advises, “Daily cleaning of the hearing aid would ideally include a brushing and quick wipe down of the hearing aid with a soft cloth or a tissue. Inspecting the domes or earmold as well as the wax guard for any cerumen or earwax that could potentially impede the sound from being emitted from the hearing aid.”
Here are some general tips which apply to all types of hearing aids, before you begin cleaning yours:
- Wash your hands before cleaning your hearing aids.
- Handle your hearing aids with care, holding them over a soft surface or cloth to avoid any damage should you accidentally drop them.
- Turn your hearing aids upside down when cleaning so that any debris will fall out of any openings you are cleaning, instead of staying lodged inside.
- Do not use alcohol or chemicals for cleaning unless they are specifically formulated for hearing aids.
- Never use pointed objects, such as scissors or needles, for cleaning.
- Once you have cleaned your hearing aids, leave them safely in their case or charger for the night.
Specific cleaning and maintenance tips for the three major hearing aid styles
Hearing aids come in different styles, and there are slight nuances to keeping each type in tip-top form.
BTE hearing aids
Behind-the-ear (BTE) style hearing aids have the main processing unit tucked behind the ear, and this is connected by a tube to the earmold in the ear. BTEs look almost identical to receiver-in-canal (RIC) hearing aids. The main difference is all the electronic parts of a BTE are held inside the case behind the ear, and sound travels from the hearing aid through the tube and earmold, then into the ear canal. In RICs, a wire connects the processing unit to a receiver/speaker that transmits sound into the ear canal via a soft eartip (dome) or custom earpiece.
ReSound BTE hearing aids.
Here are some BTE cleaning tips:
- Clean the microphone ports using a cleaning brush to remove any dust or debris.
- Check hearing aids for debris and use a soft dry cloth, cleaning brush, or cleansing wipe made specifically for hearing aids to wipe external parts.
- Remove the earmold from the hook to clean it. Use the supplied brush to clean the earmolds and use a wax pick or wire loop to remove stubborn wax or debris.
- If there is wax deeper in the vent, use the vent cleaner to push it out.
If you find debris in the earmold or in the tubing that cannot be removed with a cleaning brush, you can separate the earmold and tubing from the ear hook by twisting gently (your hearing care professional can instruct you on this, or see the hearing aid owner's manual). You can then clean the earmold part in warm soapy water and leave it to dry overnight before reattaching it to the hearing aid. To promote quicker drying, you can use a bulb blower (or earmold air blower) to force the water out of the tubing.
Another way to clean connecting tubes of BTE hearing aids with earmolds is to use a special type of cleaning floss. “Often times hearing aids will come with a thin fishing wire that can be threaded through an earmold tube or a thin tube to remove wax that may get lodged in the tube,” explains Buahnik.
McAlexander adds, “This type of cleaning does not need to be done on a daily or even weekly basis. I typically recommend that patients clean the tubing as needed—usually, you will be able to see the wax clogging the tubing, or you may hear a difference in how you hear. Some of my patients simply have their tubing cleaned (or changed) at their audiology appointments and do not worry about cleaning it at home.”
RIC hearing aids
Chances are pretty good you have a receiver-in-canal (RIC) hearing aid; they now constitute over 80% of all the hearing aids dispensed each year in the United States. As noted above, RICs have two electronic component parts: the main processing unit that sits behind the ear, and the receiver that is usually situated in either a flexible dome or custom-made earmold. It's this latter part you'll need to focus most on.

In this video sponsored by Oticon, Dr. Cliff Olson, AuD, shows how to properly clean your RIC hearing aids. Closed captions are available on this video. If you are using a mobile phone, please enable captions clicking on the gear icon.
Here's three basic steps for cleaning RICs:
- Use a soft brush or cleaning brush to remove any debris from the microphone ports, and around the push button and wax guards. Change the wax guard if needed.
- If you notice wax on the dome, you can remove it and wipe it with a soft cloth or a cleaning wipe specifically for hearing aids; if you have a custom earmold instead of a dome, make sure the earmold vent and receiver are both free of wax and debris.
- Wipe your entire hearing aid with a soft cloth or a cleaning wipe specifically for hearing aids.
ITE hearing aids
In-the-ear (ITE) hearing aids are situated outside of the ear canal, and the terms "ITE" or "Custom hearing aids" are often used for styles that include full-shell and half-shell ITEs, in-the-canal (ITC), completely-in-canal (CIC), and invisible-in-canal (IIC) hearing aids. These styles are referred to as "custom" hearing aids because their shells are usually custom-made by a professional to conform to the unique contours of your ear canal. However, there are also non-custom ITEs that are designed for an "instant-fit" in the ear.
 Hearing Aid - Applied Hearing Solutions")
Dr. Cliff Olson, AuD, provides instruction on how to clean an ITE hearing aid. Closed captions are available on this video. If you are using a mobile phone, please enable captions clicking on the gear icon.
Here are some cleaning tips for ITEs:
- Use a soft brush to clear away any built-up wax or debris. Focus your cleaning on the openings on the device, including the microphone port, receiver, and vent openings.
- Change out the wax trap if needed (see instructions above).
- Next, use a wax pick or hook to clear anything out of the holes that didn’t come out with the brush.
- For larger vents, run a vent cleaner carefully through the opening in each direction to push out any wax.
- Wipe the whole device aid using a soft dry cloth or a cleaning wipe specifically for hearing aids.
Special maintenance advice for OTC hearing aids
OTC hearing aids are gaining in popularity, but how do you maintain their longevity?
“OTC hearing aids are still very new to both patients and audiologists, so we are all still learning how to best work with these new devices. My best advice is to read the instruction manual provided to make sure that you are replacing and cleaning the necessary parts of the devices,” suggests McAlexander.
 Over-the-counter hearing aids can be serviced by hearing care professionals for cleaning and moisture removal. However, hearing care clinics may be unable to help you with other services like receiver replacement, and you should expect the clinic to charge you for their services.
 “Regular maintenance of the hearing aids and taking caution not to be too aggressive with the delicate receivers will aid in the longevity and functionality of all hearing aids, including over-the-counter devices,” says Buahnik. “If the device stops working, it is likely due to wax; therefore, using the wax guard tools will be helpful in removing the wax-filled trap and replacing it with a new one.”
Some audiology clinics are offering to help patients adjust to and maintain their OTC devices for a fee. If you need additional help, reach out to local clinics to see if these services are available.
Take advantage of professional services
One major benefit of purchasing hearing aids from an audiologist or hearing aid specialist is it usually includes adjustments, repairs, and cleaning for the devices. Most dispensing offices offer a free annual hearing check and also provide routine hearing aid maintenance at the same time. It's likely you paid for this in the price of your hearing aids, so take advantage of these services!
Likewise, if your hearing aids are not working as they should, even after cleaning them, see your provider for help. They can clean your hearing aids professionally, using special vacuums with specialized attachments that gently remove wax from hard-to-reach areas. They can also thoroughly clean the vents, microphone screens, and receivers and may also give the aids a good drying. Your provider can also check your hearing aids for damage, repair them if needed, and adjust your hearing aid settings to ensure they are working at their best for your hearing needs.
“Ideally, after the initial adaptation period, a patient should follow up every six months to a year to have their hearing aids evaluated,” says Buahnik. “Particularly while still under warranty to ensure that if a covered repair is needed that it is performed in a timely manner.”
“Some patients may require more frequent appointments for cleaning or regular maintenance—especially if they have dexterity or cognition concerns,” adds McAlexander. “Your audiologist should work with you to create the best plan for ensuring that your hearing aids work the best they can for as long as possible!”
The above is the interpretation of How to Clean and Maintain RIC, BTE, ITE, and OTC Hearing Aids provided by Chinese hearing aid supplier Shenrui Medical. Link https://www.sengdong.com/Blog/How-to-Clean-and-Maintain-RIC-BTE-ITE-and-OTC-Hearing-Aids.html of this article is welcome to share and forward. For more hearing aid related information, please visit Blog or take a look at our Hearing aids products


